How To Make Adorable Dog Bows
Learn how to make a cute bow for your dog using a few pieces of fabric, thread and needle. It’s so easy and he will look ready to party!

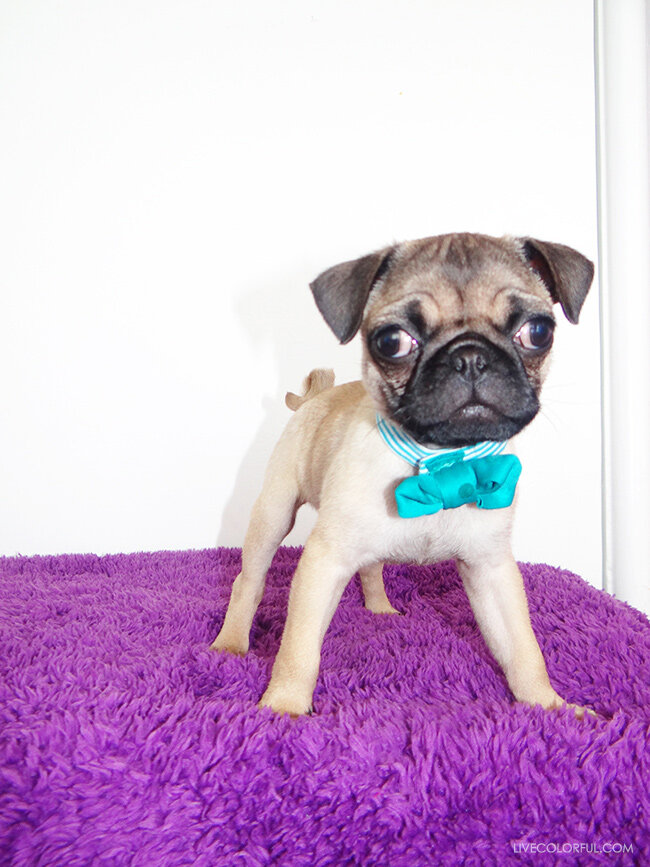
Your dog is adorable, I’m sure, but imagine your dog, wearing a bow, yep, even cuter!
I’m a big fan of accessorizing my dog, he’s not always as excited as I am, but most of the time he likes getting all the extra attention, so it’s mostly a win win.
A cute little bow can go a long way, and may not bother your dog as much, as say, a hat or a sweater. Your dog is totally going to bring all the dogs to the dog park with this easy DIY bow.
Check out the tutorial below and make him one of each color!

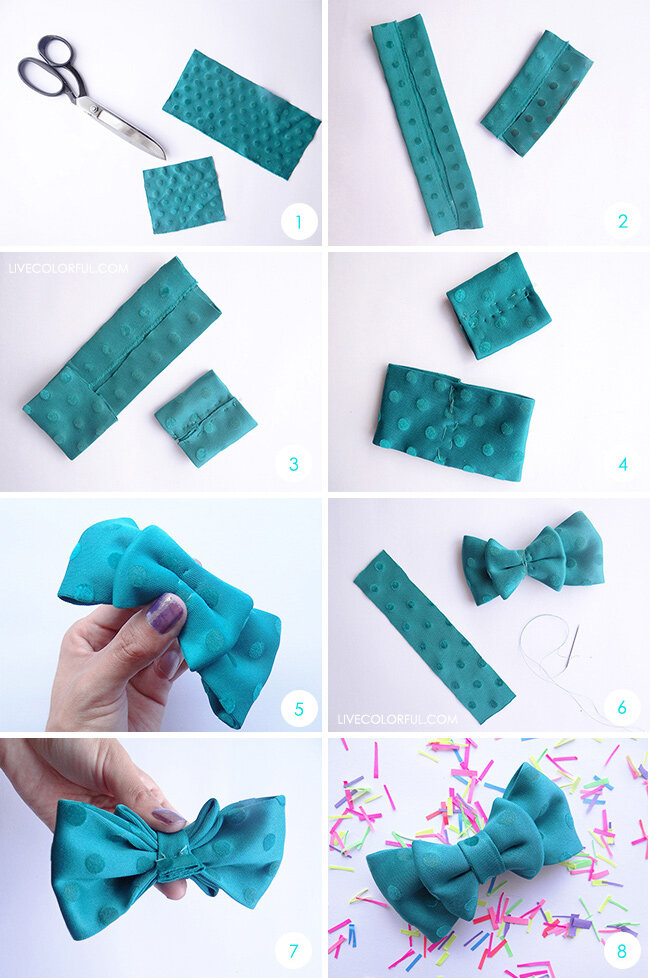
These are the materials you need to make adorable dog bows in 8 easy steps
MATERIALS:
Fabric. You will need three pieces of fabric. The first one should measure 4 x 5 inches (10 cm x 12 cm), the second one 4 x 9.5 inches (10 cm x 24 cm) and the third one 1 x 2.5 inches (1.5cm x 6 cm)
Sewing scissors. Out favorites lately are these because they last forever!
Needle and thread
Some kind of brooch or clasp
How To Make Adorable Dog Bows:
Cut the fabric. The first one need to measure approximately 4 x 5 inches (10 cm x 12 cm), the second one 4 x 9.5 inches (10 cm x 24 cm) and the third one 1 x 2.5 inches (1.5cm x 6 cm).
Fold two pieces of fabric in half . Fold the pieces that measures 4 x 5 inches (10 cm x 12 cm) and the one that measures 4 x 9.5 inches (10 cm x 24 cm) in half, vertically, and one time on each side until the borders connect to each other, like you see in picture above step 2.
Fold them again, but this time horizontally and inwards (as shown in the step 3 in the picture above).
Add a few stitches to hold the fabric in place. You should have like two fluffy, thick pieces of fabric.
Attach these two pieces together. Use thread and a needle and go around and around the center of the two pieces and make sure the two pieces stay together and have a shape of a bow.
Cover any imperfections. Use the extra small piece of fabric, the one that measures 1 x 2.5 inches (1.5cm x 6 cm) to hide the stitches. Fold it just like you did in step number 2, and sew it around the center of the bow.
Sew the back. This way you will finish and close your bow.
Your dog’s bow is ready!

You can attach your new bow to your dog’s collar using fabric glue or a few brooches or clasps.
You can also make a simple collar, using fabric. To make a collar you need to measure your dog’s neck or to get the length. You’ll need to make something like this, with the headband to create the collar shape.
When your new collar is the perfect size for you dog, add the brooches and clasps to the corners so it close and your dog is ready to party with his adorable bow!